Table of Contents
Abstract
As the rate of cyber-attacks continues to increase, it is essential for organizations to respond to security incidents quickly. The faster that Incident Responders can begin analyzing evidence, the better chance that they have to prevent additional malicious activity after compromise. This research intends to focus on how to use Kape to shorten incident response analysis times.
1. Introduction
Kape is an acronym for Kroll Artifact Parser and Extractor and was created by Kroll director Eric Zimmerman. Kape lets incident response teams collect and process computer artifacts within minutes. Kape can find and prioritize the most critical systems to a case and collect key artifacts before memory and disk imaging. This functionality means no longer having to wait for full system image completion to analyze the forensic data gathered. (Kroll, 2020)
The traditional way of performing incident response was to run a memory dump and full hard drive image on any computer of interest. An incident responder would be unable to complete any additional tasks during this time, usually several hours. Once the memory and disk images are created, they are loaded into a forensic tool such as Axiom, FTK, or Encase. The average image processing and indexing time after the images were loaded is approximately six hours. Traditionally, most incident responders would spend time manually hunting on the target computer for any item of interest. Live forensics starts with a manual review of startup items and services to determine how the attacker maintained persistence. Between grabbing the forensically sound images and the forensic tools processing time, an entire working day was lost, waiting on hard drive forensics to complete. Incident Responders are also limited to the number of computers that they could simultaneously triage because there are a finite number of USB drives where images could be stored.
The traditional way of performing incident response was to run a memory dump and full hard drive image on any computer of interest. An incident responder would be unable to complete any additional tasks during this time, usually several hours. Once the memory and disk images are created, they are loaded into a forensic tool such as Axiom, FTK, or Encase. The average image processing and indexing time after the images were loaded is approximately six hours. Traditionally, most incident responders would spend time manually hunting on the target computer for any item of interest. Live forensics starts with a manual review of startup items and services to determine how the attacker maintained persistence. Between grabbing the forensically sound images and the forensic tools processing time, an entire working day was lost, waiting on hard drive forensics to complete. Incident Responders are also limited to the number of computers that they could simultaneously triage because there are a finite number of USB drives where images could be stored.
2. How Kape works
Kape is an acronym for Kroll Artifact Parser and Extractor and was created by Kroll director Eric Zimmerman. Kape lets incident response teams collect and process computer artifacts within minutes. Kape can find and prioritize the most critical systems to a case and collect key artifacts before memory and disk imaging. This functionality means no longer having to wait for full system image completion to analyze the forensic data gathered. (Kroll, 2020)
The traditional way of performing incident response was to run a memory dump and full hard drive image on any computer of interest. An incident responder would be unable to complete any additional tasks during this time, usually several hours. Once the memory and disk images are created, they are loaded into a forensic tool such as Axiom, FTK, or Encase. The average image processing and indexing time after the images were loaded is approximately six hours. Traditionally, most incident responders would spend time manually hunting on the target computer for any item of interest. Live forensics starts with a manual review of startup items and services to determine how the attacker maintained persistence. Between grabbing the forensically sound images and the forensic tools processing time, an entire working day was lost, waiting on hard drive forensics to complete. Incident Responders are also limited to the number of computers that they could simultaneously triage because there are a finite number of USB drives where images could be stored.
The traditional way of performing incident response was to run a memory dump and full hard drive image on any computer of interest. An incident responder would be unable to complete any additional tasks during this time, usually several hours. Once the memory and disk images are created, they are loaded into a forensic tool such as Axiom, FTK, or Encase. The average image processing and indexing time after the images were loaded is approximately six hours. Traditionally, most incident responders would spend time manually hunting on the target computer for any item of interest. Live forensics starts with a manual review of startup items and services to determine how the attacker maintained persistence. Between grabbing the forensically sound images and the forensic tools processing time, an entire working day was lost, waiting on hard drive forensics to complete. Incident Responders are also limited to the number of computers that they could simultaneously triage because there are a finite number of USB drives where images could be stored.
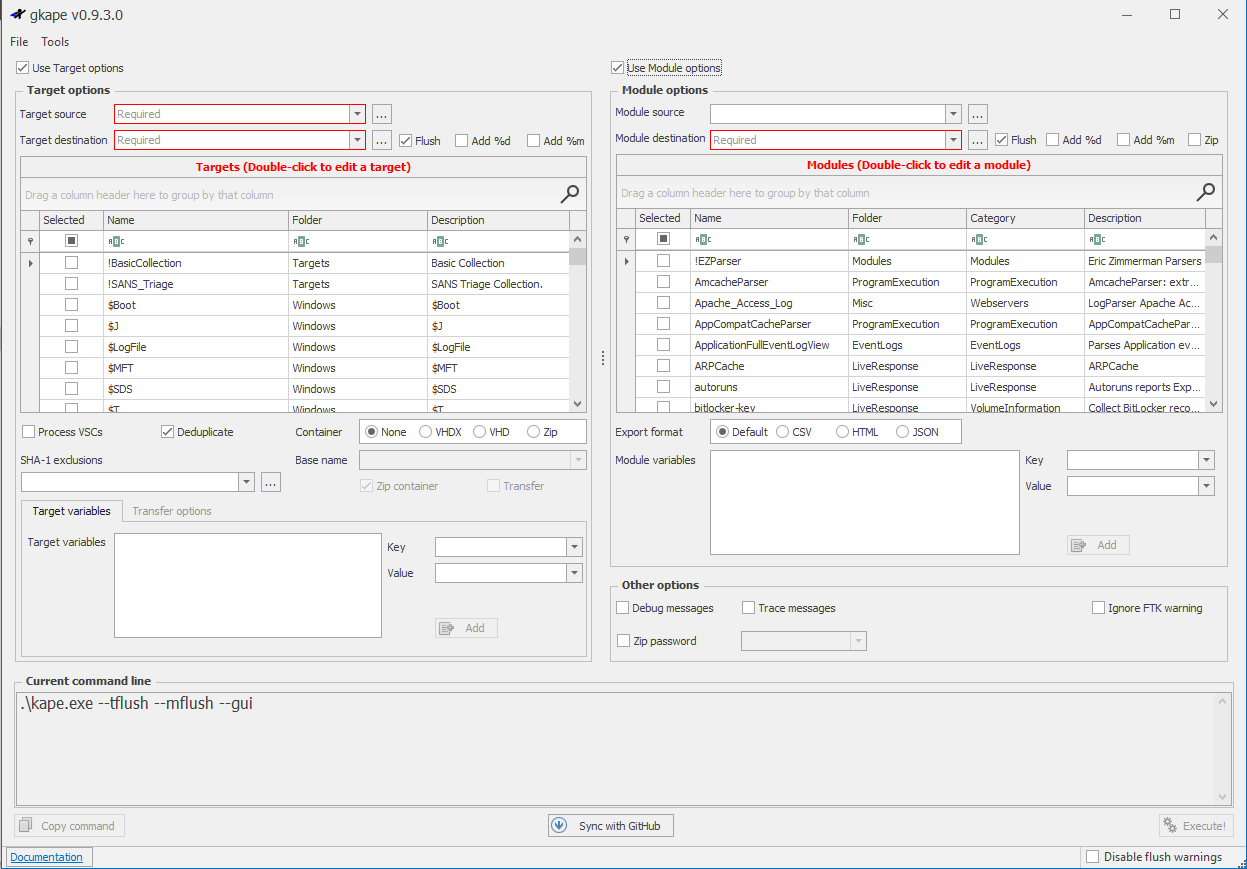
Figure 1 – Gkape Full Interface
The two primary components of Kape are target collection and module execution:
- Targets are collections of file and directory information that is forensically important. Please see Figure 2.
- Modules run programs. These programs can target anything, including files collected via targets. It is important to note that Modules can only run a single command. Kape requires a module for every executable that runs against collected data. Please see Figure 3.
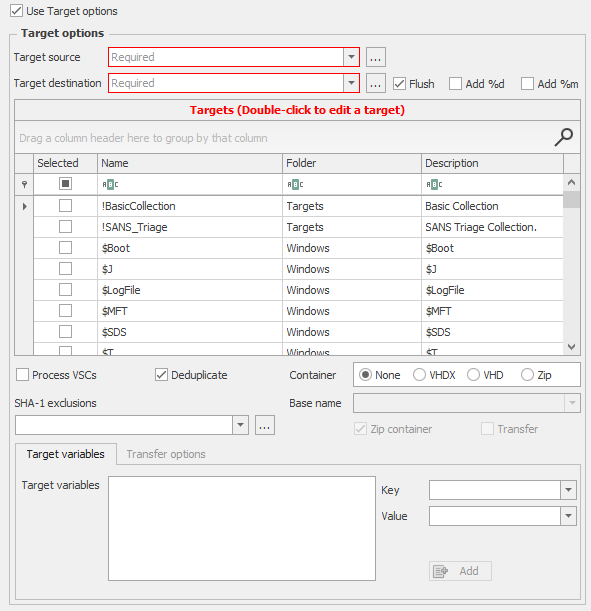
Figure 2 – Gkape Target Options
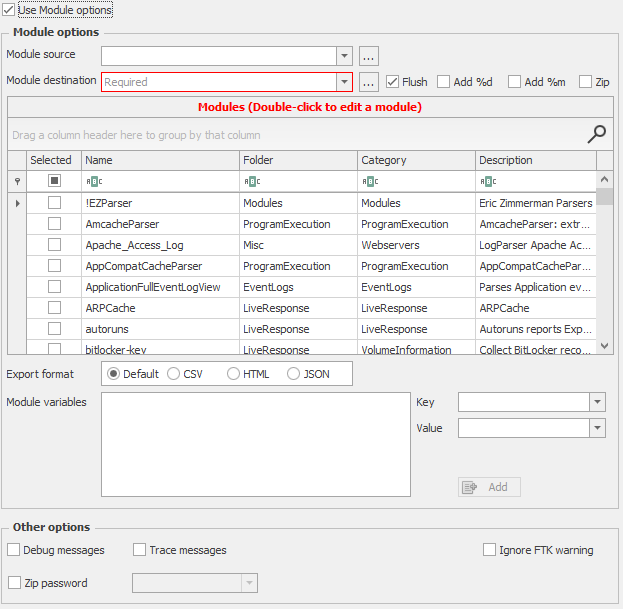
Figure 3 – Gkape Module Options
Gkape contains a section that shows the current command line usage based on the target and module options selected. Please see Figure 4.
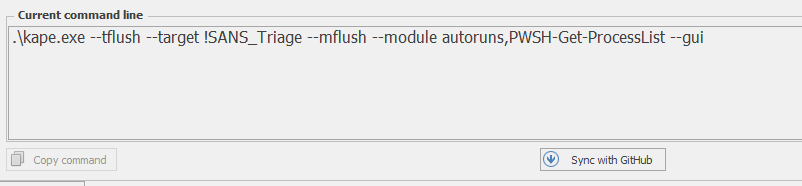
Figure 4 – Gkape current command line
Several of the collection options offered by Kape contain groups of other collections. Collection groups minimize the options that need to be selected for the incident responder to achieve their desired configuration. The collection of Kape scripts that would run can be viewed by double-clicking on the collection. Please see Figures 5 and 6. (Zimmerman, 2020)
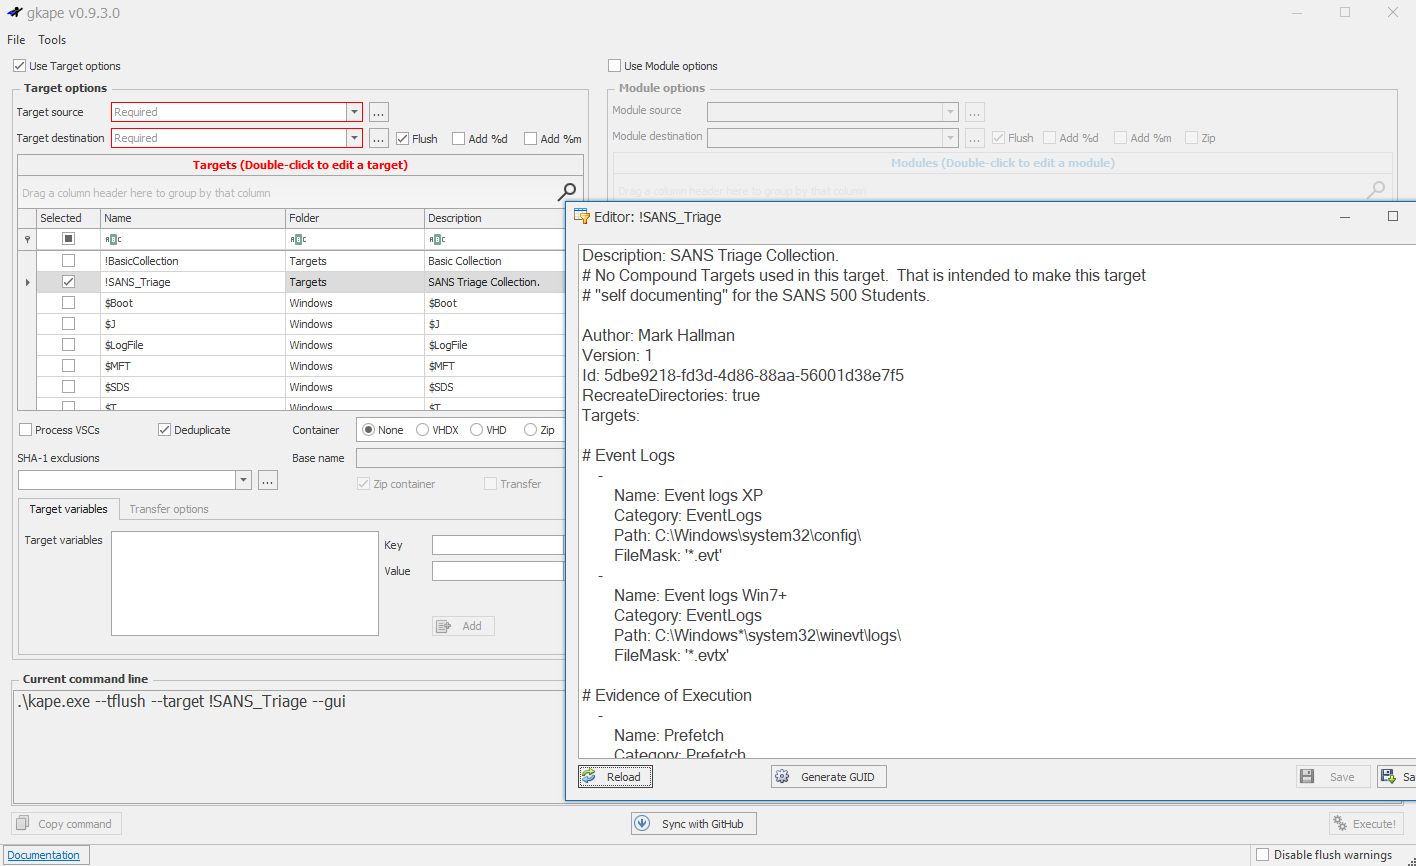
Figure 5 – Gkape View Collection Scripts
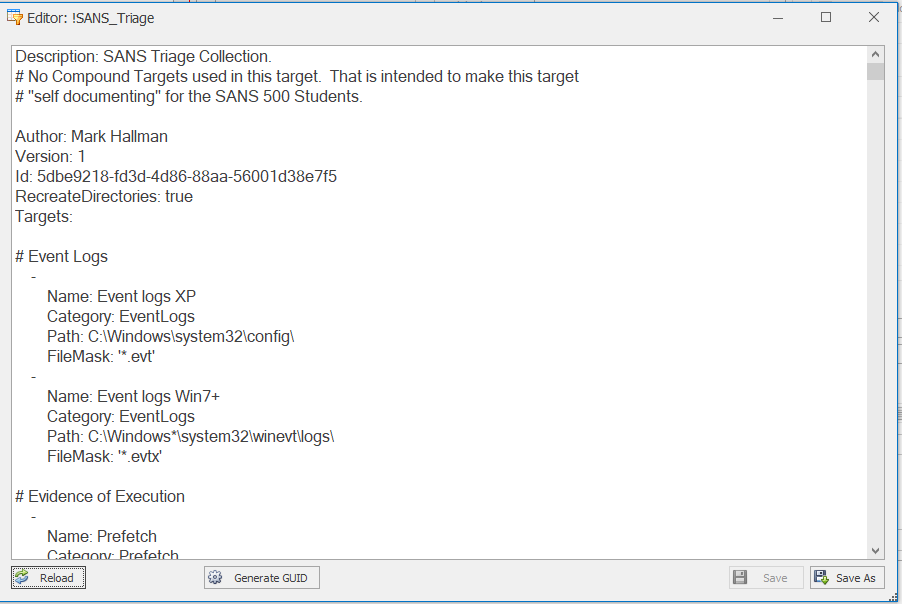
Figure 6 – Gkape Script Details
Before using Kape, a user must download external modules. Downloading external modules is performed by running the included Get-KAPEUpdate.ps1 PowerShell script. Some modules may need to be downloaded from an external source. Kape will notify the User of any of these external dependencies. Kape will provide instructions on how to download and install the dependency. Kape intentionally does not bundle in all of the binaries needed because Kape leverages programs from many different authors. You can always find the URL of the binary dependency required by using the below command and adjusting the directory as required for each category.
–mlist . –mdetail
Since Kape is a command-line application, it can easily be scripted to perform forensics on remote computers. Kape can be run remotely using either psexec.exe or by leveraging the enterprise’s software deployment tool. Kape requires administrative permissions on the endpoint to retrieve forensic artifacts correctly. Kape is such a lightweight forensics tool that it is perfect for pulling triage information over a slower network before pulling the computer for full forensics imaging. Accessing the triage information earlier enables the incident responder to start their investigation sooner.
It is important to note that Kape is only available on Microsoft Windows. GRR Rapid Response is a similar live-forensic tool that is available for Linux and OS X.
It is important to note that Kape is only available on Microsoft Windows. GRR Rapid Response is a similar live-forensic tool that is available for Linux and OS X.
3. How to use Kape for live Incident Response
Memory captures should be gathered first for nearly all incidents. Memory captures are critical to the forensic methodology because of how computer processes behave. Memory images preserve the following information lost on reboot:
- Running processes (Owner, PID, Parent PID, Injections, unencrypted commands)
- Network Connections (Open ports, IP addresses)
- Current Users (Type of logon, Location, command line history)
- Open files (Unencrypted file, User that opened file)
The incident responder performs memory captures with Kape by selecting the WinPmem module or using this command:
kape.exe –msource C: –mdest %1\%computername%\ –module WinPmem
The incident responder needs to set %1 to the drive letter of the drive where the memory image is copied. Depending on the type of security incident, a full forensic disk image may still be necessary, but Kape generally makes traditional forensic techniques seem archaic. (DeGrazia, 2019)
The easiest option for speeding up incident response times is to use Kape for live-forensics before capturing a full hard drive image. Capturing a full hard drive image allows the incident responder to start their investigation sooner and minimize downtime while also allowing the incident responder to use traditional forensics techniques. Kape has thirty-four specifically designed modules for live response. We used Kape (Version 9.3.0; Zimmerman, 2020) to complete the table in Figure 7.
The easiest option for speeding up incident response times is to use Kape for live-forensics before capturing a full hard drive image. Capturing a full hard drive image allows the incident responder to start their investigation sooner and minimize downtime while also allowing the incident responder to use traditional forensics techniques. Kape has thirty-four specifically designed modules for live response. We used Kape (Version 9.3.0; Zimmerman, 2020) to complete the table in Figure 7.
| Module Name | Description |
|---|---|
| ARPCache | ARPCache |
| autoruns | Autoruns reports Explorer shell extensions, toolbars, browser helper objects, Winlogon notifications, auto-start services, and much more. |
| DNSCache | DNSCache |
| Get-InjectedThread | Get-InjectedThread |
| Get-NetworkConnection | Get-NetworkConnection including timestamps |
| Handle | Handle is a utility that displays information about open handles for any process in the system. |
| IPConfig | IPConfig |
| NBTStat_NetBIOS_Cache | NBTStat_NetBIOS_Cache |
| NBTStat_NetBIOS_Sessions | NBTStat_NetBIOS_Sessions |
| NetStat | NetStat |
| NetSystemInfo | Gathers Basic System Information Using the Net Command |
| NetSystemInfo_Accounts | Gathers Basic System Information Using the Net Command (Accounts) |
| NetSystemInfo_Administrators | Gathers Basic System Information Using the Net Command (members of local administrator group) |
| NetSystemInfo_File | Gathers Basic System Information Using the Net Command (File) |
| NetSystemInfo_LocalGroup | Gathers Basic System Information Using the Net Command (LocalGroup) |
| NetSystemInfo_Session | Gathers Basic System Information Using the Net Command (Session) |
| NetSystemInfo_Share | Gathers Basic System Information Using the Net Command (Share) |
| NetSystemInfo_Start | Gathers Basic System Information Using the Net Command (Running Services) |
| NetSystemInfo_Use | Gathers Basic System Information Using the Net Command (Use) |
| NetSystemInfo_User | Gathers Basic System Information Using the Net Command (User) |
| NetworkDetails | NetworkDetails |
| ProcessDetails | Combination Module for LiveResponse. Gathering Running Process Details. |
| psfile | PsFile is a command-line utility that shows a list of files on a system that are opened remotely, and it also allows you to close opened files either by name or by a file identifier. |
| psinfo | PsInfo is a command-line tool that gathers key information about the local or remote Windows NT/2000 system, including the type of installation, kernel build, registered organization and owner, number of processors and their type, amount of physical memory, the install date of the system, and if it’s a trial version, the expiration date. |
| pslist | Shows statistics for all running processes. |
| psloggedon | PsLoggedOn is an applet that displays both the locally logged on users and users logged on via resources for either the local computer, or a remote one. |
| psservice | Display the configured services (both running and stopped) on the local system. |
| pstree | Shows a basic process tree for all running processes |
| PWSH-Get-CimInstance_ProcessList | Display running processes and context information |
| PWSH-Get-ProcessList | Display a running process list with a variety of fields |
| qwinsta | Display information about Active Remote Desktop Services sessions. - Query Windows Station |
| RoutingTable | RoutingTable |
| SystemInfo | Gathers Basic System Information |
| tcpvcon | TCPView provides a more informative and conveniently presented subset of the Netstat program that ships with Windows. |
Figure 7 – Kape Live Response Options
One way to leverage Kape in conjunction with traditional forensics tools is to have Kape collect the KapeTriage collection. The KapeTriage collection includes file system ($MFT, $LogFile, $Boot, $J, $SDS), Registry Hives, Scheduled Tasks, Web Browser, Link files, jump lists, and remote access information. Once this is collected, these files can be manually loaded into Axiom, FTK, or Encase. Manually loading these files provides a way to quickly collect forensic artifacts and analyze them in traditional robust forensics tools. The concept of Kape as a forensics triage tool is expanded later in this paper. (Thinkdfir, 2019)
The final option for using Kape to speed up incident response analysis time is to use Kape excusively. Kape is robust enough to compete with full forensics suites directly. One of the drawbacks of this approach is that Kape’s output is several unrelated files. It can be challenging to keep the files organized and to track artifact comments. Kape provides a timeline feature that is generally only found in commercial forensic programs. The Kape “mini_timeline” module parses the MFT, event logs, and registry hives to create a CSV file with the combined timeline. For the computer name to be included in the timeline correctly, a variable with the Key computerName must exist. The value for the variable should be the name of the computer. If the computer has been in use for more than a year, then the CSV timeline generated is most likely too large to open in excel. The incident responder uses The Mini_Timeline_Slice_by_Daterange module to narrow down the information in the timeline. The Mini_Timeline_Slice_by_Daterange module requires a Kape variable named dateRange to function correctly. The value for the dateRange key should be in the following format: mm/dd/yyyy-mm/dd/yyyy.
The final option for using Kape to speed up incident response analysis time is to use Kape excusively. Kape is robust enough to compete with full forensics suites directly. One of the drawbacks of this approach is that Kape’s output is several unrelated files. It can be challenging to keep the files organized and to track artifact comments. Kape provides a timeline feature that is generally only found in commercial forensic programs. The Kape “mini_timeline” module parses the MFT, event logs, and registry hives to create a CSV file with the combined timeline. For the computer name to be included in the timeline correctly, a variable with the Key computerName must exist. The value for the variable should be the name of the computer. If the computer has been in use for more than a year, then the CSV timeline generated is most likely too large to open in excel. The incident responder uses The Mini_Timeline_Slice_by_Daterange module to narrow down the information in the timeline. The Mini_Timeline_Slice_by_Daterange module requires a Kape variable named dateRange to function correctly. The value for the dateRange key should be in the following format: mm/dd/yyyy-mm/dd/yyyy.
The following scripts are recommended for use as appropriate, depending on the forensic engagement:
- Kape_Default – This script pulls a forensic memory image using Kape and then runs a full Kape capture and timeline. Kape_Default allows the Kape results and memory to be analyzed before a complete hard disk image is collected.
- Kape_Full – Perform memory capture, full Kape triage with a timeline, and hard drive capture. Kape-Full is used if someone other than the primary incident responder gathers all the evidence.
- Kape_live_hd_no_memory – This runs a full Kape triage with nearly every option selected and performs a hard drive image with a hard drive image utility such as ftkimager. The Kape_live_hd_no_memory script is to be used in a specific instance. The specific instance is if a disk image is needed, and the computer has been restarted, which resulted in destroying the memory evidence.
- Kape_upload_autoruns – This is a super-fast script that will grab the autoruns and PWSH-Get-ProcessList. The script then uploads the artifacts to Azure, SFTP, or AWS.
The following scripts are recommended for use as appropriate, depending on the forensic engagement:The recommended usage for most security incidents is to run the Kape_Default script and then copy the results from this script to the incident responder’s computer for analysis. Once the incident responder copies the results to their computer, the next recommended step is to run the Kape_HD script to gather a full hard disk image if required. Running the Kape_HD script allows the incident responder to investigate the Kape triage while the entire hard drive image is being captured and processed by the traditional forensics tool of choice.
Kape allows the incident responder to get granular with what information is collected and how it is processed. Granularity is helpful when the person who wrote the Kape script is not the person performing the evidence collection. An incident responder can tailor Kape to upload the collection artifacts to SFTP, Azure, or AWS. Uploading artifacts in this way is a crucial element of performing remote evidence collection. Figure 8 demonstrates the upload options in Kape.
Kape allows the incident responder to get granular with what information is collected and how it is processed. Granularity is helpful when the person who wrote the Kape script is not the person performing the evidence collection. An incident responder can tailor Kape to upload the collection artifacts to SFTP, Azure, or AWS. Uploading artifacts in this way is a crucial element of performing remote evidence collection. Figure 8 demonstrates the upload options in Kape.
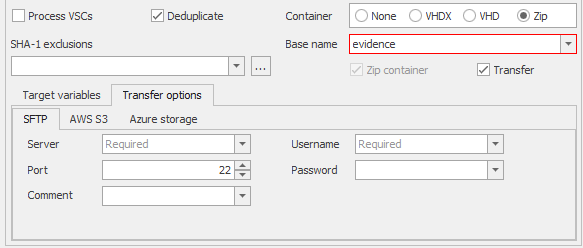
Figure 8 – Gkape Upload Options
During the early stages of an investigation involving malicious software, the best two modules to review are autoruns and PWSH-Get-ProcessList.
Autoruns is a Kape module that runs the Sysinternals Autoruns program. Autoruns has the most comprehensive knowledge of auto-starting locations of any startup monitor. It shows the incident responder the programs configured to run during system bootup or login. Additionally, Autoruns shows the start for various built-in Windows applications like Internet Explorer, Explorer, and media players. (Markruss, 2020)
See Figure 9 for an abbreviated output from the Autoruns command. It is often helpful to filter the autoruns output to narrow down the search focus. The incident responder narrows the search focus by filtering for only enabled entries and entries with a signer that is “Not verified.” The incident responder can also group the Autoruns output by category to help filter out information that is not relevant to the investigation. Grouping allows the incident responder to narrow their search for how the malware is maintaining persistence. Unfortunately, the time column does not always show helpful information, so it can be challenging to track down the newest installed persistence mechanisms.
See Figure 9 for an abbreviated output from the Autoruns command. It is often helpful to filter the autoruns output to narrow down the search focus. The incident responder narrows the search focus by filtering for only enabled entries and entries with a signer that is “Not verified.” The incident responder can also group the Autoruns output by category to help filter out information that is not relevant to the investigation. Grouping allows the incident responder to narrow their search for how the malware is maintaining persistence. Unfortunately, the time column does not always show helpful information, so it can be challenging to track down the newest installed persistence mechanisms.
| Entry | Enabled | Category | Signer | Company | Image Path |
|---|---|---|---|---|---|
| Net Driver HPZ12 | enabled | Services | (Not verified) Hewlett-Packard | Hewlett-Packard | c:\windows\system32\hpzinw12.dll |
| Pml Driver HPZ12 | enabled | Services | (Not verified) Hewlett-Packard | Hewlett-Packard | c:\windows\system32\hpzipm12.dll |
| QBFCService | enabled | Services | (Not verified) Intuit Inc. | Intuit Inc. | c:\program files (x86)\common files\intuit\quickbooks\fcs\intuit.quickbooks.fcs.exe |
| QBVSS | enabled | Services | (Not verified) Intuit Inc. | Intuit Inc. | c:\program files (x86)\common files\intuit\dataprotect\qbidpservice.exe |
| TechSmith Uploader Service | enabled | Services | (Not verified) TechSmith Corporation | TechSmith Corporation | c:\program files (x86)\common files\techsmith shared\uploader\uploaderservice.exe |
| WdNisSvc | enabled | Services | (Not verified) Microsoft Corporation | Microsoft Corporation | c:\programdata\microsoft\windows defender\platform\4.18.2007.8-0\nissrv.exe |
| WinDefend | enabled | Services | (Not verified) Microsoft Corporation | Microsoft Corporation | c:\programdata\microsoft\windows defender\platform\4.18.2007.8-0\msmpeng.exe |
| Windows Defender\Windows Defender Cache Maintenance | enabled | Tasks | (Not verified) Microsoft Corporation | Microsoft Corporation | c:\programdata\microsoft\windows defender\platform\4.18.2007.8-0\mpcmdrun.exe |
Figure 9 – Autoruns Output
PWSH-Get-ProcessList is a Kape module that runs a PowerShell script that calls the WMI object Win32_Process to list all currently running processes. This allows the incident responder to quickly track down suspicious running applications based on launch location, launch time, process owner, and process name. There is an issue with the creationdate field in the PWSH-Get-ProcessList Kape module. The creationdate is in a format not recognizable to Excel. The Kape module can easily be updated with the below code to convert this field to a better date format. The incident responder updates the following file KAPE\Modules\LiveResponse\PWSH-Get-ProcessList.mkape with the second part of the below code.
Original:
Executable:
C:\Windows\system32\WindowsPowerShell\v1.0\powershell.exe
CommandLine: -Command “Get-WMIObject Win32_Process | Select-Object Name,ProcessID,Path,commandline,@{Label=’Owner’; Expression={(Get-Process -PID $_.ProcessID -IncludeUserName).UserName}},CreationDate,ThreadCount,HandleCount,VirtualSize,Priority,@{Label=’PriorityClass’; Expression={(Get-Process -PID $_.ProcessID).PriorityClass}},@{Label=’Security ID’; Expression={$_.getownersid().SID}},@{Label=’TotalProcessorTime’; Expression={(Get-Process -PID $_.ProcessID).TotalProcessorTime}},@{Label=’Parent Path’; Expression={(Get-Process -PID $_.ParentProcessId).Path}},ParentProcessId,@{Label=’Company’; Expression={(Get-Process -PID $_.ProcessID).Company}},@{Label=’ProductVersion’; Expression={(Get-Process -PID $_.ProcessID).ProductVersion}},@{Label=’Description’; Expression={(Get-Process -PID $_.ProcessID).Description}},@{Label=’Product’; Expression={(Get-Process -PID $_.ProcessID).Product}},@{Label=’FileVersion’; Expression={(Get-Process -PID $_.ProcessID).FileVersion}},@{Label=’File Path SHA-256′; Expression={[System.BitConverter]::ToString( (New-Object System.Security.Cryptography.SHA256CryptoServiceProvider).ComputeHash([System.IO.File]::ReadAllBytes($_.Path))) -replace ‘-‘}} | Export-Csv -NoTypeInformation -Path %destinationDirectory%\PWSH-Get-ProcessList.csv “
ExportFormat: csv
Change to:
Executable:
C:\Windows\system32\WindowsPowerShell\v1.0\powershell.exe
CommandLine: -Command “Get-WMIObject Win32_Process | Select-Object Name,ProcessID,Path,commandline,@{Label=’Owner’; Expression={(Get-Process -PID $_.ProcessID -IncludeUserName).UserName}},@{n=’StartTime’;e={$_.ConvertToDateTime($_.CreationDate)}},ThreadCount,HandleCount,VirtualSize,Priority,@{Label=’PriorityClass’; Expression={(Get-Process -PID $_.ProcessID).PriorityClass}},@{Label=’Security ID’; Expression={$_.getownersid().SID}},@{Label=’TotalProcessorTime’; Expression={(Get-Process -PID $_.ProcessID).TotalProcessorTime}},@{Label=’Parent Path’; Expression={(Get-Process -PID $_.ParentProcessId).Path}},ParentProcessId,@{Label=’Company’; Expression={(Get-Process -PID $_.ProcessID).Company}},@{Label=’ProductVersion’; Expression={(Get-Process -PID $_.ProcessID).ProductVersion}},@{Label=’Description’; Expression={(Get-Process -PID $_.ProcessID).Description}},@{Label=’Product’; Expression={(Get-Process -PID $_.ProcessID).Product}},@{Label=’FileVersion’; Expression={(Get-Process -PID $_.ProcessID).FileVersion}},@{Label=’File Path SHA-256′; Expression={(Get-FileHash -Algorithm SHA256 -LiteralPath $_.Path).Hash}} | Export-Csv -NoTypeInformation -Path %destinationDirectory%\PWSH-Get-ProcessList.csv “
ExportFormat: csv
Executable:
C:\Windows\system32\WindowsPowerShell\v1.0\powershell.exe
CommandLine: -Command “Get-WMIObject Win32_Process | Select-Object Name,ProcessID,Path,commandline,@{Label=’Owner’; Expression={(Get-Process -PID $_.ProcessID -IncludeUserName).UserName}},CreationDate,ThreadCount,HandleCount,VirtualSize,Priority,@{Label=’PriorityClass’; Expression={(Get-Process -PID $_.ProcessID).PriorityClass}},@{Label=’Security ID’; Expression={$_.getownersid().SID}},@{Label=’TotalProcessorTime’; Expression={(Get-Process -PID $_.ProcessID).TotalProcessorTime}},@{Label=’Parent Path’; Expression={(Get-Process -PID $_.ParentProcessId).Path}},ParentProcessId,@{Label=’Company’; Expression={(Get-Process -PID $_.ProcessID).Company}},@{Label=’ProductVersion’; Expression={(Get-Process -PID $_.ProcessID).ProductVersion}},@{Label=’Description’; Expression={(Get-Process -PID $_.ProcessID).Description}},@{Label=’Product’; Expression={(Get-Process -PID $_.ProcessID).Product}},@{Label=’FileVersion’; Expression={(Get-Process -PID $_.ProcessID).FileVersion}},@{Label=’File Path SHA-256′; Expression={[System.BitConverter]::ToString( (New-Object System.Security.Cryptography.SHA256CryptoServiceProvider).ComputeHash([System.IO.File]::ReadAllBytes($_.Path))) -replace ‘-‘}} | Export-Csv -NoTypeInformation -Path %destinationDirectory%\PWSH-Get-ProcessList.csv “
ExportFormat: csv
Change to:
Executable:
C:\Windows\system32\WindowsPowerShell\v1.0\powershell.exe
CommandLine: -Command “Get-WMIObject Win32_Process | Select-Object Name,ProcessID,Path,commandline,@{Label=’Owner’; Expression={(Get-Process -PID $_.ProcessID -IncludeUserName).UserName}},@{n=’StartTime’;e={$_.ConvertToDateTime($_.CreationDate)}},ThreadCount,HandleCount,VirtualSize,Priority,@{Label=’PriorityClass’; Expression={(Get-Process -PID $_.ProcessID).PriorityClass}},@{Label=’Security ID’; Expression={$_.getownersid().SID}},@{Label=’TotalProcessorTime’; Expression={(Get-Process -PID $_.ProcessID).TotalProcessorTime}},@{Label=’Parent Path’; Expression={(Get-Process -PID $_.ParentProcessId).Path}},ParentProcessId,@{Label=’Company’; Expression={(Get-Process -PID $_.ProcessID).Company}},@{Label=’ProductVersion’; Expression={(Get-Process -PID $_.ProcessID).ProductVersion}},@{Label=’Description’; Expression={(Get-Process -PID $_.ProcessID).Description}},@{Label=’Product’; Expression={(Get-Process -PID $_.ProcessID).Product}},@{Label=’FileVersion’; Expression={(Get-Process -PID $_.ProcessID).FileVersion}},@{Label=’File Path SHA-256′; Expression={(Get-FileHash -Algorithm SHA256 -LiteralPath $_.Path).Hash}} | Export-Csv -NoTypeInformation -Path %destinationDirectory%\PWSH-Get-ProcessList.csv “
ExportFormat: csv
Several columns can be used as a filter to help the incident responder when they are reviewing the output from PWSH-Get-ProcessList. It is helpful to narrow down the results by looking at process start time. If the incident responder expects the malicious process to run during boot up, then look for similar process times. The incident responder should investigate the Path and Commandline fields because they would show when a commonly named process runs from a non-standard location. It is also helpful to review the parent process ID and parent process path. These fields can help track down suspicious executables that need further investigation. Review the owner field to ensure that processes are running under the correct context.
Once the autoruns and PWSH-Get-ProcessList modules have been analyzed, and the malicious software identified, the next step of the incident response process can begin. At this point, the incident responder should start tracking down how the computer was infected. The incident responder uses the remoteaccess, programexecution, systemactivity, and timelining features in Kape. These modules should show the User who ran the malicious process, remote network connections, remote desktop connections, scheduled tasks, and GPO changes. The incident responder retraces the virtual footsteps and performs forensics on the computer that initiated the malicious activity. The incident responder continues until he or she identifies the initial infected computer. Once the malicious activity has been traced back to the initial infection, the incident responder uses the browsing history module to find what websites were visited that triggered the infection. The OutlookPSTOST Kape target gathers .ost and .pst files to allow the incident responder to search for any malicious emails that may have triggered the infection.
Once the autoruns and PWSH-Get-ProcessList modules have been analyzed, and the malicious software identified, the next step of the incident response process can begin. At this point, the incident responder should start tracking down how the computer was infected. The incident responder uses the remoteaccess, programexecution, systemactivity, and timelining features in Kape. These modules should show the User who ran the malicious process, remote network connections, remote desktop connections, scheduled tasks, and GPO changes. The incident responder retraces the virtual footsteps and performs forensics on the computer that initiated the malicious activity. The incident responder continues until he or she identifies the initial infected computer. Once the malicious activity has been traced back to the initial infection, the incident responder uses the browsing history module to find what websites were visited that triggered the infection. The OutlookPSTOST Kape target gathers .ost and .pst files to allow the incident responder to search for any malicious emails that may have triggered the infection.
4. How is Kape Different from other Forensics Tools
While Kape does have the ability to perform most aspects of a full forensic collection, the best use of Kape is for live-forensics or forensics triage. Kape dynamically reads its running configuration, and based on the content, it collects and processes relevant endpoint files. Collecting and processing relevant endpoint files makes Kape very extensible in that the program’s author does not need to be involved to add or expand functionality. (Kroll, 2020)
If Kape is used to triage files, then there is a chance that Kape will not carry over specific forensic details because Kape did not perform a full disk image. Jaco has a blog post https://www.dfir.co.za/2019/02/19/calculating-the-cost-triaging-with-axiom-and-encase/ detailing how well a Kape triage performs on a capture the flag challenge compared to performing a full hard disk image. Jaco determined that the time saved using Kape for incident triage is worth an incident responder investigating. In the time since Jaco tested Kape, Kape has added several options to overcome the shortcomings that Jaco observed. At the time of this paper, Axiom is on version 4.3.1 and processes $UsrnJrnl•$J correctly. (Jaco, 2019)
When comparing Kape to other forensics suites, Kape is orders of magnitude faster gathering and parsing forensic data. This speed allows the incident responder to start their investigation sooner. Kape provides a different set of functionalities than Axiom, FTK, or Encase.
5.Conclusion
Kape has permanently changed forensics investigations by cutting out an entire business day of image processing time when Kape performs incident triage. Kape also returns live forensics results within minutes. Returning live forensics results within minutes allows Incident Responders to quickly analyze forensically significant information. Incident responders have the flexibility to augment any incident response process with Kape.
Download a .pdf version: https://www.giac.org/paper/gcih/34611/kape-fast-flexible-incident-response/152146
GIAC (GCIH) Gold Certification
Author: John Davis
Advisor: Chris Walker
Accepted: August XXth 2020
© SANS Institute
Author Retains Full Rights
Author: John Davis
Advisor: Chris Walker
Accepted: August XXth 2020
© SANS Institute
Author Retains Full Rights
Incident Repsonse
Our security ninjas can handle any situation. Find our more about stopping attacks cold.


The EITS mission is “to understand each of our customers’ unique needs, guide them toward the right security investments, and provide the best possible professional services to defend their people and their data.”
Cyber Security Services
Resources
Contact
- (704) 900-8042
- 525 North Tryon St. Ste1600, Charlotte, NC 28202